DIY Installation Tips for First-Time Camera Owners
The shortest useful answer: install your first security camera by choosing the right camera for the job, testing the view before you drill, checking Wi-Fi at the exact mounting point, confirming power, then setting sensible motion zones and privacy settings after mounting. That simple order prevents most beginner mistakes.
This guide is for homeowners and pet owners who want a camera setup that actually helps: better parcel coverage, better pet monitoring, fewer blind spots, fewer false alerts, and less ladder-based regret.
- Choose between doorbell, bulb, indoor, and outdoor cameras
- Get DIY home security camera placement right
- Set the best mounting height and angle
- Improve Wi-Fi signal and reduce glare
- Hide wires neatly and choose local vs cloud storage
Table of Contents
- Why the Installation Order Matters
- Choose the Right Camera for the Right Job
- DIY Home Security Camera Placement
- Security Camera Mounting Height Guide
- Tools Needed for Security Camera Installation
- Step-by-Step DIY Installation Guide
- How to Hide Security Camera Wires and Improve Wi-Fi
- Local vs Cloud Storage for Security Cameras
- FAQ
Before we get into screws, apps, and the traditional homeowner ritual of saying “that’ll do” while still standing on the ladder, it is worth remembering what makes a security camera useful. It is not the spec sheet. It is not the box. It is not the number of glowing marketing words. It is whether the camera sees the right thing, at the right angle, with the right connection, when something actually happens.
That is why this guide starts with planning rather than drilling. Good camera installs are mostly boring in the best possible way. They are logical, tidy, and effective. Bad installs are usually dramatic. They point at the sky, miss the parcel, record a hedge for six months, and then blame the camera.
If you want more practical household protection ideas after this guide, read our related article on smart home security gifts.
Why the Installation Order Matters
Most first-time camera owners make the same mistake: they mount first and think later. The better sequence is simple: decide the camera’s job, test the location, confirm Wi-Fi, confirm power, mount the camera, then tune alerts and storage. That order reduces rework and produces footage you can actually use.
Infographic: The Five-Step First-Time Camera Flow
That sequence is where a lot of Normanharvey community wins come from. Rowan Bell used the right inspection tool and turned a weekend headache into a satisfying fix instead of a drawn-out drama. Alex Lane did much the same with a socket tester: identify the issue clearly first, then fix it once. Camera installs follow the same logic. The right information before the first hole saves money, time, and wall patching.
Choose the Right Camera for the Right Job
The best camera is the one that suits the location. Front doors, pet zones, garages, balconies, and side paths all ask for slightly different things. First-time owners often assume “a camera is a camera.” Not quite. The hardware you pick should match the task, the power source, and how permanent you want the setup to be.
| Camera Type | Best Use | Main Strength | Watch Out For |
|---|---|---|---|
| Doorbell camera | Front doors and apartment entries | Visitors, parcel drop-offs, face-level view | Mounting height and neighbour privacy |
| Bulb camera | Porches, garages, covered outdoor lights | Easy retrofit into an existing light socket | Socket placement can affect angle and glare |
| Indoor smart camera | Pets, hallways, internal entry zones | Simple setup and flexible placement | Privacy settings matter a lot |
| Battery-powered camera | Sheds, gates, rental-friendly spots | Fewer wires and flexible placement | Battery life depends on motion and Wi-Fi |
For Front Doors and Deliveries
If your main goal is seeing who approached the front door, whether they rang, and where a parcel was left, a doorbell camera usually makes the most sense. It naturally fits that location, keeps the lens close to face level, and is easy for first-time owners to understand in daily use.
Ringo™ WiFi Video Intercom Doorbell 
The Ringo™ WiFi Video Intercom Doorbell fits neatly into this part of the story because it solves the very first beginner question: “What camera should I put at the front door?” If your household gets regular parcel deliveries, visiting tradies, school pickups, or you simply want to see who is approaching before opening the door, this style of camera is where many people should start.
For Covered Entryways, Garages, and Outdoor Lights
If you already have a suitable light fitting, a bulb camera can be a very tidy option. It lets first-time owners try outdoor camera coverage without creating a whole new power route. That makes it especially attractive for homeowners who want to monitor a porch, garage, driveway edge, or covered entrance.
Smart Bulb Camera - Advanced WiFi Home Security Camera 
The Smart Bulb Camera works best when the fitting already gives you a useful view. It is not magic; the light socket position still matters. If the socket is tucked too far under an eave or points into shiny garage doors, you can get glare or dead angles. But when the location is right, it is a genuinely practical beginner option.
For Pets, Hallways, and Indoor Monitoring
Pet owners usually care less about the cinematic majesty of the frame and more about whether they can see the crate, bed, door, or food area clearly. Indoor cameras should face the part of the room that matters, not the emptiest corner. If you are checking on a dog, cat, or very managerial guinea pig, camera placement should follow their actual habits.
FlexiSpy™ USB Camera - 1080p Clarity, Motion Detection, Flexible Fun 
The FlexiSpy™ USB Camera is especially useful if you want a flexible angle or a simple indoor setup for desks, shelves, hall tables, or a pet-monitoring nook. It suits people who want coverage without making the room feel like a tiny airport control tower.
DIY Home Security Camera Placement
DIY home security camera placement is really about one question: where does the important action happen? That might be at a front door, a side gate, a garage, a parcel spot, a pet flap, or a back fence path. If you aim at the right movement corridor, even a modest camera becomes useful. If you aim badly, even an expensive one becomes decorative technology.
Graph: Best Areas to Prioritise for First Camera Coverage
This is not scientific destiny. It is a practical priority guide for typical homes and pet-owning households.
As a rule, cameras should cover entry points, expected approach paths, and valuable zones. That means front doors, back doors, driveways, garages, side gates, and any side path a person would naturally use to move unseen. For pet owners, it may also mean the dog area, cat access point, or that one sofa where the pet definitely “never” goes when you are out.
Doors and gates deserve priority because they are predictable movement zones.
Aim along the walkway or path a person must travel, not at a random scenic angle.
Parcels, tools, cars, bikes, sheds, and pet areas are worth direct visibility.
What you should avoid is almost as important. Do not point a camera into neighbours’ windows or deep into public areas if you can help it. Do not aim directly at rising or setting sun if there is another angle available. And do not let shrubs, hanging plants, or a decorative flag become the main star of your motion alerts.
Security Camera Mounting Height Guide
Mounting height affects everything: faces, package visibility, tamper resistance, and false alerts. First-time owners tend to mount too high because “higher sees more.” True, but it often sees more of the wrong stuff. A sky-heavy view does not help much when what you really needed was a clear face or a parcel on the doorstep.
| Location | Typical Height | Why It Works | Classic Mistake |
|---|---|---|---|
| Video doorbell | About 1.22 m / 48 in | Captures faces and parcel zones well | Mounting too high near the top of the frame |
| Outdoor wall camera | About 2.4–3 m | Balances visibility and tamper resistance | Pointing sharply down and missing approach context |
| Driveway camera | About 2.4–3 m | Sees people and vehicles without obvious reach | Facing directly into headlights |
| Indoor pet camera | Shelf height or high corner | Keeps a broad room view with lower chewing risk | Putting it too low for paws, tails, or curiosity |
Mini Chart: Beginner-Friendly Mounting Heights
A very sensible trick is to temporarily tape the camera into place and test the view in the app before mounting it permanently. Walk up the path, stand close to the door, set a parcel down, and do a night test. This five-minute check is one of the cheapest bits of wisdom in the entire article.
Tools Needed for Security Camera Installation
People often search for a tools checklist because they do not want the job to stall halfway through. Sensible instinct. The basic install usually needs a drill, measuring tape, level, pencil, suitable screws or anchors, a screwdriver, and your phone for live view and Wi-Fi setup. But a few extra tools make the whole process much cleaner and calmer.

A precision driver kit is especially useful when the camera housing, battery compartment, bracket, or app-reset point uses smaller fasteners. It saves you from doing the classic first-time installer move of forcing the wrong screwdriver into the wrong screw and then pretending that was always the plan.
Fixmastuff™ | 48-in-1 Multi-Tool Screwdriver Mobile Phone Repair Set 
The Fixmastuff™ kit plays a similar supporting role for small brackets and setup screws, particularly if your install becomes a “quick tweak” session after testing the live view.
Magnetic Wristband - Keep Your Tools Handy 
Once you are on a ladder or crouched awkwardly by a wall, the Magnetic Wristband becomes far more charming than it sounds. It holds screws and bits where you can actually reach them rather than on the ground, in a pocket, or in another dimension.
LED Flashlight Half-finger Gloves: Hands-Free Light - Waterproof and Durable 
These hands-free light gloves are particularly handy for shaded eaves, garages, roof spaces, or any “why did I start this at dusk?” moment.
Basic Installation Checklist
- Drill and suitable drill bits for your wall surface
- Screws and wall plugs matched to timber, brick, masonry, or plasterboard
- Screwdriver or precision driver kit
- Level and tape measure
- Phone with camera app installed
- Stable step ladder
- Wi-Fi password ready before you climb
Step-by-Step DIY Installation Guide
This is the part most first-time camera owners came for. Good. Let’s do it properly.
Step 1: Define the Camera’s Job
Write down the one job the camera needs to do. “Watch the front door.” “Check on the dog.” “See if anyone enters the side gate.” “Capture parcel deliveries.” When the purpose is clear, placement becomes much easier. Without that clarity, people tend to install cameras that simply “see a lot” without seeing anything especially useful.
Step 2: Test the View Before You Mount
Hold or temporarily tape the camera at the proposed mounting point and preview the live view in the app. Walk through the scene. Open the gate. Stand close to the lens. Set down a parcel. Let the pet walk through as they normally would. This is how you spot blind spots before they become a permanent feature.
Step 3: Check Wi-Fi Signal at the Actual Spot
Many Wi-Fi problems are really placement problems. Walls, mirrors, metal, garages, and brickwork can weaken the connection. Stand at the exact mounting point with your phone, test signal strength, and if possible test the camera feed itself before you drill.
Graph: Most Common Beginner Camera Problems
Step 4: Confirm Power
Some cameras need a power point, some use batteries, some plug into a USB adapter, and some fit an existing light socket. This matters before you commit. If you are dealing with mains electrical work, outdoor fittings, or anything you are not licensed to do, use a qualified electrician. DIY confidence is excellent; DIY electrocution remains unpopular.
Step 5: Drill and Mount the Bracket
Mark the holes, use the right drill bit for the wall type, insert any anchors you need, then mount the bracket firmly. Keep it level. A crooked camera might still record, but it announces itself as a rushed install every time you look at the playback.
Hexagon Wrench Set - Easy-to-Identify Color-Coded Hex Key Tools for Efficient Work 
Some mounts and accessory brackets use hex fittings, so a set like this becomes useful far sooner than many beginners expect.
Professional 7-Piece Wrench Set with Color-Coded Ratchet Wrenches 
For larger brackets or heavier mounting points, ratchet wrenches make tightening neater and less annoying, especially in confined spaces.
Step 6: Attach the Camera and Set the Angle
Once the bracket is up, attach the camera and adjust the angle while looking at the live feed. Aim along likely movement paths rather than directly at empty walls. If it is an outdoor install, keep the lens out of direct headlight glare and strong sun where you can.
Step 7: Connect to Wi-Fi and Configure the App
Follow the manufacturer’s app process to connect the camera to Wi-Fi. If the camera supports 2.4 GHz only, make sure your network setup allows that. Then set notification zones, person detection where available, and sensible motion sensitivity. You do not need a push notification every time a branch thinks about moving.
Step 8: Test Day, Night, and Real-Life Use
Night footage, infrared reflection, porch lights, rain, and pet movement can all change what the camera really captures. Test in daylight and after dark before declaring the job done. That extra test is the difference between a setup that looks finished and one that actually works.
How to Hide Security Camera Wires and Improve Wi-Fi
How to hide security camera wires is one of those questions that sounds cosmetic but is actually practical. Tidy wiring is less obvious, less likely to be damaged, and less likely to become a trip hazard, chew toy, or general household embarrassment. Use clips, cable trunking, or conduit suitable for the location. Outdoor runs need weatherproof thinking, not just enthusiasm.
Wire Stripper Box - Electrician's Wire Stripping Kit for Tight Spaces 
For suitable low-voltage camera wiring tasks, a proper stripping kit helps keep cable ends clean. And if you are connecting or protecting low-voltage cable joins outdoors, weatherproof connectors matter too.
Waterproof Electrical Heat Shrinkable Terminal Connector - Buy Waterproof Connector 
These connectors make sense where weather resistance matters for appropriate low-voltage connections. As always, anything involving fixed mains electrical work should be handled legally and safely.
Wi-Fi strength deserves equal attention. If the signal is weak, the camera may buffer, drop out, or chew through battery faster. Test signal at the actual mounting point. If it is marginal, move the router, use mesh Wi-Fi, or choose a slightly different camera position. A camera with poor connectivity is like a security guard who keeps wandering off for tea.
Safety Reminder
If you are drilling near unknown wiring or doing anything involving live mains circuits, stop and get a professional. One of the reasons Normanharvey customers love diagnostic tools is that they prevent guesswork before a mistake becomes expensive or dangerous.
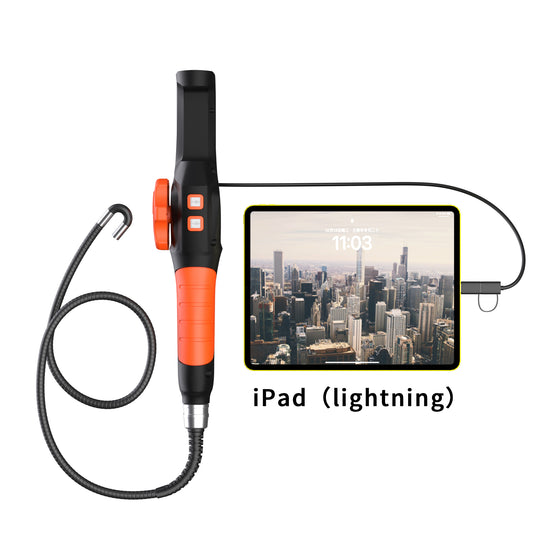
Plissken™ 200° 2MP Steerable Articulating Snake Camera Inspection Endoscope 1920 x 1080P 
The Plissken™ inspection endoscope is a brilliant example of a product woven into the real installation story rather than just tacked on at the end. If you are planning a cable route through a tight gap, wall cavity, ceiling void, or behind garage shelving, being able to look first is pure common sense. Frank from the experiences doc loved exactly this principle: he did not want to crawl over everything blindly anymore, and a snake camera let him see the problem properly.

Thermal multimeters like the S15 are not required for a basic camera install, but they fit beautifully into the “first see, then fix” mindset Normanharvey is known for. Steven from Oklahoma used a thermal camera multimeter to spot a hot bearing and a hidden battery drain. For camera owners, this kind of tool can help identify suspicious heat, electrical quirks, or just save a call-out when you want to understand your setup more deeply.


The S14 and S13 belong in the same family of practical diagnostic confidence. That matters because first-time owners often do not just want a camera; they want more confidence about what is happening around the house. Products that help you inspect, understand, and maintain the home are part of the same practical ecosystem.
Local vs Cloud Storage for Security Cameras
Once the camera is physically installed, storage becomes the next big choice. Local storage gives you direct control and often avoids ongoing fees. Cloud storage usually makes remote access easier and can preserve footage if the camera is stolen or damaged. Neither choice is automatically better. The right answer depends on how important the footage is and how much convenience you want.
Comparison Chart: Local vs Cloud Storage
- No monthly fee in many cases
- Footage stays on your device or card
- Simple for pet cameras and lower-risk areas
- Risk: if the camera is stolen, the footage may go too
- Easy remote access and clip sharing
- Safer if the camera itself is damaged or taken
- Useful for doors, deliveries, and important entries
- Trade-off: subscription cost and account security matter more
For most first-time owners, a hybrid approach works well if the camera supports it: local storage for convenience, cloud storage for important events. Whatever you choose, use strong passwords and two-factor authentication where available. The FTC, NCSC, and CISA all broadly emphasise the same thing: connected cameras should be treated like serious devices, not casual toys.
What Makes a First-Time Camera Setup “Good”?
A good setup captures the right thing, sends sensible alerts, respects privacy, and stays connected reliably. It does not need to be complex. In fact, simpler is often better. The point is not to build a suburban spy network. The point is to make daily life easier, safer, and calmer for the people and pets who actually live there.
A Normanharvey View on Practical Security
Practical gifts and gadgets should solve real problems again and again. A good home camera setup does exactly that. It helps with packages, pets, visitors, side gates, tool sheds, and peace of mind. It keeps being useful. That is the real difference between a gimmick and a keeper.
Quick Installation Checklist
- Pick the camera type that suits the location.
- Test the view before mounting.
- Check Wi-Fi at the exact mounting point.
- Confirm power before drilling anything.
- Use the right hardware for the wall surface.
- Set motion zones and reduce false alerts.
- Test day and night footage.
- Secure the app account and update firmware.
Go to Normanharvey.com if you want practical camera gear, installation helpers, diagnostic tools, and useful products that solve household problems properly instead of just looking clever on the box.
FAQ
How do I install wireless security cameras?
Choose the camera location, test Wi-Fi and live view at the exact spot, confirm power, mount the bracket, attach the camera, connect it in the app, and then set motion zones and storage settings. Test again in daylight and at night.
What is the best mounting height for a security camera?
For many outdoor wall cameras, about 2.4 to 3 metres works well. For video doorbells, around 1.22 metres or 48 inches is commonly recommended because it captures faces and parcels more effectively.
How do I hide security camera wires?
Use cable clips, conduit, or cable trunking suitable for the wall and weather conditions. Keep cables tidy, protected, and out of reach where possible. Do not guess with mains electrical work.
What causes security camera blind spots?
Blind spots usually come from bad angles, cameras mounted too high, obstacles in the frame, or focusing on the wrong area. Testing the actual movement path before you mount the camera is the best fix.
Is local or cloud storage better for security cameras?
Local storage is often cheaper over time and keeps footage close to home. Cloud storage is more convenient for remote access and can preserve clips if the camera is stolen. Many households like a mix of both.